Getting started with Docker can be a bit confusing, there's a lot of jargon like "images", "containers", and "Dockerfiles" thrown at you. Even after you watch a few tutorials, the purpose of each thing can still be unclear. This article is intended for people who have installed Docker and played around a bit, but could use some clarification. We're going to make all three core pieces of Docker and give some helpful other commands. It's going to cover a lot, be sure to click the links.
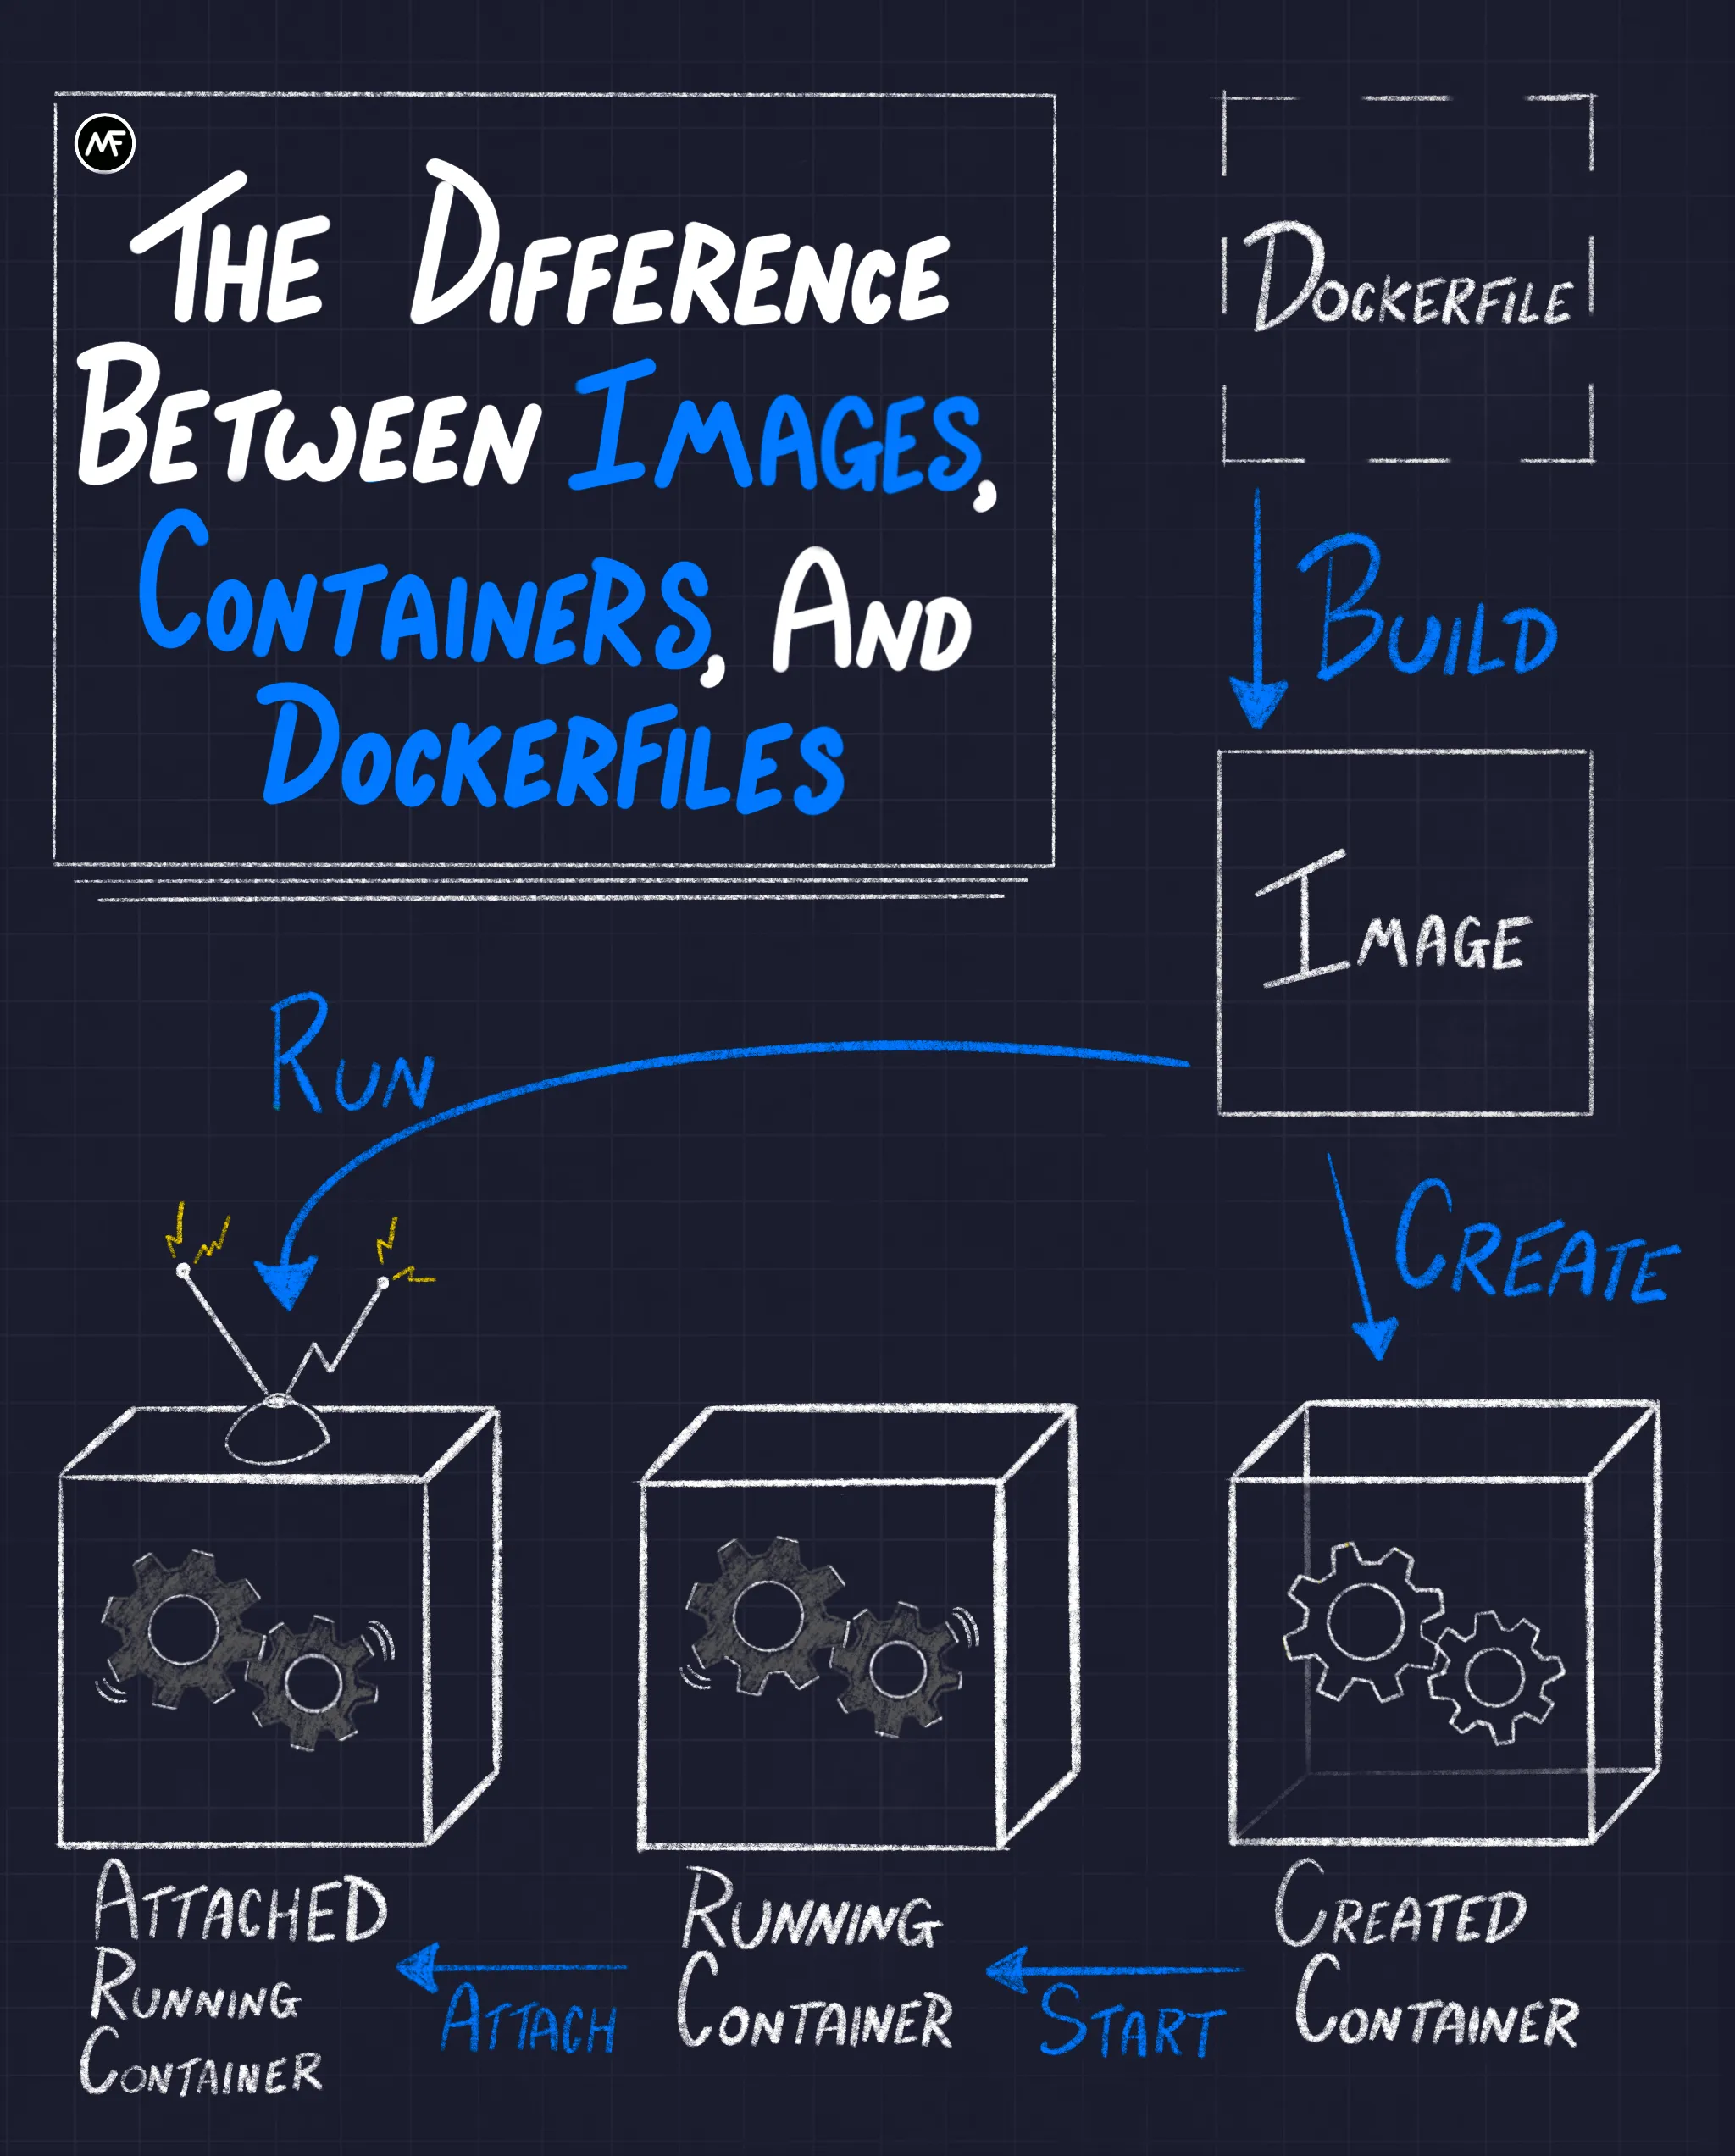
Refer to this graphic as a guide as we work through everything:
Skip to the end for a cheat sheet of every command we'll use
We're going to step through every piece of this graphic, but it's helpful to see the three main stages upfront as a roadmap. In short, Dockerfiles are used to build images. Images are used to create containers. You then have to start and attach to containers. The run command allows you to combine the create, start, and attach commands all at once.
All of the code we need for this project should stay in the same directory. That shouldn't be hard because we'll only have a server.js file and next to it a Dockerfile. All that server.js file will do is send a simple text response and log the hit. This is the only Node code in the tutorial. You do not need to know Node, we just need some long standing process so our container doesn't immediately shut down.
What are Dockerfiles?
A Dockerfile is simply a text file with instructions that Docker will interpret to make an image. It is relatively short most of the time and primarily consists of individual lines that build on one another. It is expected to be called Dockerfile (case sensitive) and does not have a file extension. Here is a simple example:
This isn't a tutorial on how to write Dockerfiles, but let's talk about this for a second. What our Dockerfile is doing is pulling down the Node image called "node:23.6.0" FROM DockerHub (or your machine) so we can build our custom image on top of it. DockerHub is an online repository of images; kind of like NPM or Pip. Then we're COPYing our server.js into the environment so our eventual container will have access to it. The last thing in a Dockerfile is usually a CMD (command) for the container to run once it's made. In our case it's going to start our server.
NOTE: It is crucial that each piece of the CMD array is surrounded by double quotes or else it won't work properly.
Building our image
Intuitively, the way to build an image from a Dockerfile is to run the build command. The following command assumes we're in the same directory as our server.js and Dockerfile:
The . tells Docker to build from the Dockerfile in the current directory. As a bonus, we gave our image a tag of my-node-img. This will help us specify which image we are using without having to use an id. Here's a guide on image tags. You should know that you can use image and container IDs instead of tags and names, but words are easier to remember. Building can take a minute, but once done, we will have our image! See it by running:
What is a Docker image?
If a Dockerfile is a set of instructions used to create an image, it's helpful to think that an image is just a template used to create a container. An image is responsible for setting up the application and environment that will exist inside the container. The important thing to understand is that images are read-only. You do not make edits to an image, you make edits to the Dockerfile and then build a new image.
One of the features that makes Docker so powerful is that images can be layered. In every Dockerfile, you'll be pulling down a base image to start from. And those base images are probably built from others, it's images all the way down. This layering effect helps with things like caching for CI/CD purposes. But anyway, images aren't good for much besides creating containers, so let's do that!
Create a container
Finally, we're getting to the good stuff. This is technically all you need to do to create a container:
However, for our server example, that's kind of useless. We'll need to add some flags:
The --name lets us assign our own name to our container. Docker will auto generate a name for the container if we don't, but they're long and terrible. The --init means we're using the Tini package that comes built in with Docker. It handles ctrl-C and keeps us from getting stuck in our container. Next up is -p, which connects our host machine's port 3000 to the Docker container's port 3000. Without this, we wouldn't be able to connect to our server. The last argument is the actual image tag that will create our container.

What is a container?
The container is what actually runs our app. Think of the container like an isolated Linux box. It's essentially a lighter weight virtual machine. The point of having a container is standardization. An application only has to care about the container it's run in. No more, “But it works on my machine!” If an app runs in a container, it will work the same way no matter where the container itself is hosted*. This makes both local development and production deployments much, much easier.
* That's mostly true, maybe like 99.9% of the time. But in fact, docker does utilize system level caching so it's possible that a change in the caches on two machines will lead to different behaviors. It's exceedingly rare, but I have hit it. So if your docker containers behave differently on one machine, check the caches.
Starting a container
All create did was create the container, it didn't start it. You can still see that it exists with docker ps and some extra filters:
But, if you go to "localhost:3000", nothing happens. Our container still isn't active, it just...exists; its status is merely created. Start it by running:
Now when you go to localhost:3000, it responds! Since our container is officially “running” we can also see it with a regular docker ps, which by default only shows running containers.
Attaching to a container
How do we see our container's outputs and logs? Well, there's technically a command you can run, but hang on before typing it:
docker attach my-app
Be warned: if you run attach, your terminal is going to get stuck displaying the container logs. Worse, if you attach and then ctrl-C to get out, it will actually stop the container on exit. Or worse, it will just ignore the ctrl-C and trap your terminal. If that ever happens to you, you'll have to open a new terminal and stop the container (more on that later). That's why in your applications you should handle the SIGTERM or use the Tini package like we have in our example. A better way to see output is the Docker logs command:
That will show you the logs as they print from your container, continuously. ctrl-C to get out of this with no interruptions to your container. If you just want the logs to print out statically, omit the -f flag.
Exploring the container
If you want to go into the container to explore the file system, you'd want to run this:
exec executes any command on a running container. If it's going to be an interactive one, like opening a bash shell, you must include the -it flags. Also, heads up that some containers may not have bash installed, so you might need to try sh if it doesn't work (sh is an older, smaller shell program than bash).
Stop and remove containers
Before you can move on to the run shortcut, you'll need to remove the running container. Luckily it's straightforward to stop and remove containers:
And to stop all running containers:
The subshell is using the -q (quiet) flag to only return the container ids, which are then fed into the stop command.
Shortcut with run
As you remember with the infographic, run is a shortcut that takes care of create, start, and attach all at once:
However, like we talked about, attaching takes up the terminal, which is probably not what you want. Run the command with the -d flag (detached mode) so the container starts in the background:
All the options are still doing the same thing they were doing with create, with the exception of the new --rm flag. This simply removes our container from our machine when we stop the container. That will allow you to run the same command without namespace issues; it's mainly for practicing.
DockerHub image and run commands
run doesn't actually need the image to be on the host machine. If Docker can't find the specified image locally, it will try to find it on DockerHub. This is useful when paired with another feature of run: it can execute a command on the newly created container. For example, you could spin up a Node image and then start it in bash instead of the default Node repl:
Remember, you only need the -it flags if the command is interactive. If you just wanted to see the Linux version for example, no flags are necessary:
Debian GNU/Linux 12 \n \l
Next steps
We've had one container, yes, but what about a second container? That's another powerful feature of Docker: you can easily network containers together. But once you have 2 or more containers to manage, I wouldn't recommend that you try to control them from the command line. In fact, even if you have only one container, the command line interface isn't great. No, what you'll want to start using is a container orchestration system, usually it'll be Docker Compose for local development and Kubernetes for actual production. I recommend watching this video to pick up the basics of Docker Compose and this series to take a deeper dive with Kubernetes.
Happy coding everyone,
Mike
The Cheat Sheet
Back to the start of the article